In the world of print design and production, ensuring the highest quality output is essential. Two crucial elements that play a significant role in achieving professional print results are crop marks and printer’s bleed. These terms may sound technical, but understanding them is crucial for designers, printers, and anyone involved in the print production process. In this blog post, we will delve into the world of crop marks and printer’s bleed, explaining their purpose, importance, and how to utilize them effectively.
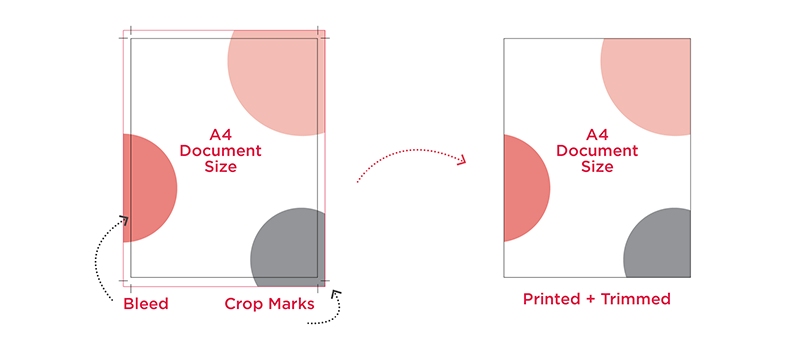
Crop Marks: Crop marks, also known as trim marks or registration marks, are thin lines or tick marks placed at the corners or edges of a printed document. They serve as a visual guide for the printer to accurately trim the document to its intended finished size. Crop marks indicate where the cuts should be made and help ensure that the final printed piece aligns correctly.
The primary purpose of crop marks is to provide precise guidelines for trimming a document to its final size, especially in cases where multiple items are printed on a larger sheet and later separated. Crop marks allow printers to achieve accurate alignment and avoid any unwanted white space or incomplete images along the edges of the printed piece.
Printer’s Bleed: Printer’s bleed refers to the area beyond the trim edge of a printed document. It is an extra margin intentionally added during the design phase, extending the artwork or image beyond the final size. The bleed ensures that when the document is trimmed, any slight misalignment or movement during the cutting process does not leave any unwanted white space along the edges.
Typically, printer’s bleed extends or 3-5 mm beyond the trim edge. This extra space is necessary because most printing devices have slight variations in cutting accuracy. By incorporating a bleed, designers ensure that the design elements extend beyond the trim marks, allowing for minor variations without compromising the visual integrity of the printed piece.
The bleed area is eventually trimmed off during the finishing process, resulting in a clean and professional-looking final product with no visible white edges. It also prevents any unwanted borders or text from being too close to the trim edge, minimizing the risk of them being accidentally cut off during production.
Using Crop Marks and Printer’s Bleed Effectively: To ensure that crop marks and printer’s bleed are utilized effectively, it is crucial to follow some best practices:
- Design with Bleed in Mind: When creating your artwork or document, extend any background colors, images, or design elements that reach the edge beyond the trim size by the specified bleed amount.
- Set Up Crop Marks: Use graphic design software to add crop marks to your document. Crop marks should be positioned precisely at the corners or edges of the final trim size.
- Exporting and Handing Over Files: When delivering print-ready files to the printer, ensure that crop marks are included and that the file includes the required bleed area. Common file formats like PDF are preferred for print production, as they preserve the layout and include all necessary elements.
Crop marks and printer’s bleed are indispensable tools in the print production process. By understanding their purpose and incorporating them correctly into your designs, you can ensure that your printed materials have a professional finish with clean edges and no unwanted white space. Remember to account for printer’s bleed during the design phase and provide clear crop marks to guide the printer during trimming. Working collaboratively with your printer and following these best practices will result in visually appealing print products that meet your expectations and delight your audience.